

 3D printing technology has revolutionized the creation of complex and custom shapes, but achieving a high-quality finish often requires post-processing. Painting 3D printed parts can enhance their appearance, protect them from environmental factors, and make them more suitable for their intended use. This guide will walk you through the essential steps to prepare, prime, and paint your 3D printed projects for a professional-looking result.
Tool Checklist
For painting 3D printed parts with precision and achieving a high-quality finish, it’s imperative to have a comprehensive set of tools on hand. Ensure that each of these tools is readily available before commencing the task:
- Safety equipment such as gloves, mask, and goggles
- Fine-grit sandpaper for surface preparation
- A hobby knife to remove excess material
- Mounting putty or a holder to secure the part
- Soap and water for cleaning the part
- Tack cloth for dust removal
- High-quality primer designed specifically for 3D printed materials
- Spray can handle attachment for ease of application
- Primer mixing supplies if necessary (e.g., stirring sticks)
- Quality spray paint in desired colors
- Clearcoat spray for protection
Each tool plays an integral role in preparing and painting your 3D printed part. From initial cleaning to final clear coating, having this selection at your disposal will facilitate a smooth process and aid in obtaining exceptional results.
Priming 3D Printed Parts
1.Remove supports from your 3D printed part
The initial step in preparing a 3D printed part for painting is to carefully remove all support material that was added during the printing process. Supports are typically used to hold up overhanging features or stabilize intricate designs while printing, but once the printing is complete, they become redundant and can be removed.
Using a pair of needle-nose pliers, gently wiggle the supports away from the actual part. It’s important to avoid using excessive force which could potentially damage or deform the piece you wish to paint. Some supports might break off cleanly, whereas others may require a bit more patience and precision.
After dislodging larger pieces with pliers, inspect your 3D printed object for any remaining small support fragments or areas where the support structures were attached. These residual marks can be subtle yet still visible after painting if not thoroughly addressed—a precision craft knife may come in handy for scraping away these small imperfections.
2.Sanding Down Support Marks
After the removal of supports, residual marks are often left on the surface of the print. These imperfections can be visible even after painting if not properly addressed. Begin by selecting the appropriate grit sandpaper; a coarser grit can be used initially to remove the bulk of the support marks. It’s essential to sand carefully to avoid removing excessive material or causing pits in the surface that could compromise the integrity and appearance of your part.
Once the prominent support marks have been reduced with coarser sandpaper, switch to finer grits in a sequential manner. This gradual transition allows for a smoother finish while minimizing scratches that may have been introduced during initial sanding steps. Apply steady pressure and regularly inspect your work, ensuring even progress across all areas where supports were attached. The final goal is an even, smooth surface free from defects, ready for subsequent priming and painting processes. Remember to handle your part gently throughout this process to maintain its shape and detail.
3.Sand and Smooth Surface
Begin with a coarse-grit sandpaper to remove the larger imperfections, such as visible layer lines or blemishes left behind by support structures. Gradually transition to finer grits of sandpaper, working methodically over the entire surface of the part.
Throughout this process, maintain a consistent pressure and pattern to avoid creating grooves or uneven surfaces on the part. After leveling out the larger irregularities with coarse abrasives, employ medium-grit sandpaper to refine the smoothness further. Lastly, use fine-grit sandpaper for final smoothing; this step will help minimize scratches in preparation for primer application.
It’s imperative to frequently clear away any accumulated dust as you progress through various grit levels; this ensures that no particles are embedded into the piece which would mar the smooth finish. Consistent inspection between each stage allows for addressing any persistent defects before moving ahead in your workflow.

4.Mount the Part
To begin, select an appropriate mount that provides firm support and does not interfere with the shape of your component.
One effective method for mounting involves using a rod or stick which can be inserted into an existing hole in the part or temporarily attached with hot glue or double-sided tape, depending on the size and weight of the printed object. If such attachment points are leveraged, ensure they are on areas of the part that will not be visible post-painting to prevent any cosmetic defects.
For smaller parts, consider fixing them to a board or tray lined with wax paper or plastic film; this allows for easy rotation without directly handling the object, reducing fingerprints and potential smudges. Using a non-permanent adhesive like putty can be beneficial as it holds the piece steady but releases easily without damage.
5.Washing the Surface to Remove Dust
The surface should be washed carefully, ensuring not to soak materials that may be sensitive to water. Utilize a mildly soapy solution and a soft sponge or cloth for this task. Gently scrub the surfaces without being abrasive, as vigorous washing may damage fine details or leave scratches.
Once washed, rinse the part with clean water to eliminate any soap residue which could interfere with primer adhesion. Confirm that all recesses and crevices are properly rinsed as trapped soap can cause issues later in the painting process. After rinsing, the part should be dried completely using a lint-free towel or allowed to air dry in a dust-free environment. Air drying might take longer but can significantly reduce the risk of introducing new contaminants onto the cleaned surface.
6.Wipe Down the Surface with a Tack Cloth
After sanding and before applying primer, it is essential to ensure a clean surface free of any debris. Using a tack cloth is an effective method for capturing dust particles that may impair paint adhesion or leave unsightly bumps in the finish. For best results, gently wipe down the entire 3D printed part with a tack cloth, applying minimal pressure to avoid leaving residue from the cloth itself.
7.Mixing the Primer
Start by preparing your work space and gathering all necessary safety equipment such as gloves and a mask. Review the manufacturer’s instructions to understand the specific mixing ratio required for your primer—this is often indicated on the primer packaging or accompanying material. Different primers may have unique requirements depending on their chemical composition.
Shake or stir your primer thoroughly before mixing to make sure it’s homogenous. If you’re using a two-part primer, which includes a base and a catalyst, pour them into a mixing container according to the specified ratio. Be precise in your measurements; an incorrect mix can result in inadequate adhesion or inconsistent drying times.
For spray application, if the viscosity of the mixed primer seems too thick, consider adding an appropriate thinner. Add this sparingly and according to guidelines to avoid altering paint quality. Once mixed, use a filter to transfer your primer into the spray gun’s pot; this will catch any particulates or undissolved components that could clog the nozzle.
Timing also plays a critical role after you’ve mixed your primer. Most primers have a ‘pot life’ —a period during which they remain usable after being mixed with their catalyst or hardener. Exceeding this time could compromise its effectiveness, so only mix what you anticipate using within that window.
In preparing for application, practice spraying technique on scrap material to get familiar with the flow and pressure required for optimal coverage— especially important when working on finely detailed parts where precision is key. Once confident in consistency and ready for application onto your 3D part, proceed efficiently while respecting curing intervals as necessary between coats.
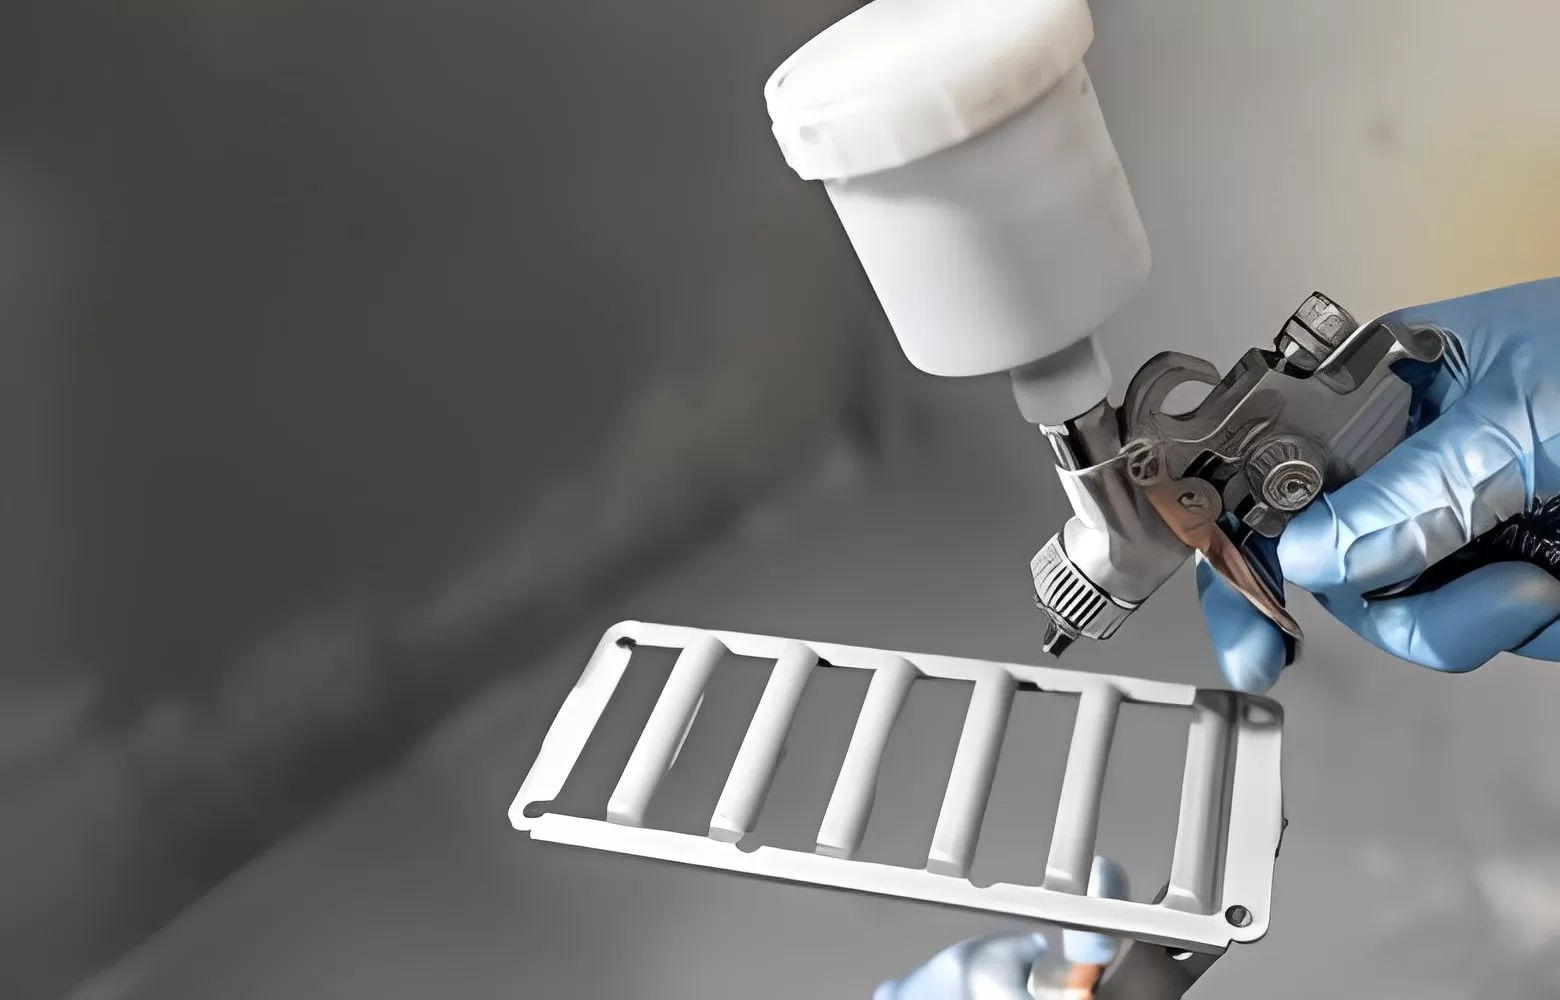
8.Spraying the First Coat of Primer
To start, ensure you have prepared your workspace with proper ventilation and protection against overspray. Use even strokes to apply the primer, holding the spray can approximately 8 inches away from the part’s surface. Move in a smooth, continuous motion to avoid drips and uneven coverage.
It’s vital to coat the part lightly during this initial application; aim for full coverage without saturating the surface, which might cause runs or pooling of primer. The objective is to achieve a thin, even layer that adheres well to every contour. If your part has intricate details or hard-to-reach spots, maneuver accordingly to cover these areas thoroughly while maintaining a uniform layer.
After spraying, allow sufficient time for the primer to dry according to the manufacturer’s instructions before inspecting it. This period also aids in revealing any imperfections or missed spots that will need attention before proceeding with additional layers or coats.
9.Inspect the First Coat
Careful examination of this foundational coat ensures that any imperfections are identified before additional layers are added. Look for signs of uneven coverage, drips, bumps, or missed spots—any of these issues can diminish the final appearance if they are not rectified at this stage.
Should you encounter such irregularities on the primed surface, address them promptly to avoid complicating later stages of finishing. Use fine-grit sandpaper to smooth out runs or drips and fill in gaps where coverage was insufficient. Once these corrections have been made, wipe away any resulting dust.
10.Spray the Final Coat of Primer
After allowing sufficient drying time following your initial primer layer, you are now ready to apply the final coat. Begin by thoroughly mixing your primer to achieve a consistent blend, which is crucial for an even application.
Proceed to spray the final coat over the entire surface area, employing a steady back-and-forth motion to maintain uniform coverage. It’s imperative to keep the spray can or gun at a consistent distance from the part as recommended by the primer manufacturer—usually within 6-8 inches—to avoid runs or sags. Overlap each pass slightly to ensure there are no gaps in coverage.
Inspect this last application carefully once it’s dried, watching for any imperfections or unevenness. If you identify rough spots or areas where coverage seems too thin, consider lightly sanding these spots and applying touch-up coats as needed. The goal is to attain a fully covered surface that is smooth and free from defects, providing an excellent foundation for subsequent paint layers.
Painting 3D Printed Parts
1.Starting with a Primed and Mounted Part
Before initiating the actual painting process, confirm that the primer has been evenly applied and thoroughly dried. This layer not only serves as the foundation for your paint but also helps to reveal any surface imperfections that may require additional attention before proceeding. Check that the part is firmly fastened to its mounting apparatus—whether it be a holder, clamp, or another stabilizing device—to prevent any movement during painting which could lead to uneven coating or smudges. Once your piece is primally covered and stably positioned, you’re set to move forward to buffing and polishing for exemplary adhesion of subsequent paint layers.
2.Buff and Polish the Primed Surface
Begin by utilizing a fine-grit sandpaper or a specialized polishing tool designed for use on primed surfaces. Gently work over the entire area of your 3D printed part in circular motions, exerting minimal pressure to avoid wearing through the primer. The objective here is to remove any minor imperfections or texture that may have resulted from priming.
Once you’ve covered all parts evenly, examine the surface carefully under ample lighting to spot any missed patches or remaining roughness. As you eliminate these blemishes, maintain steady movements to create an even sheen across the piece. Pay attention not to over-sand as this could expose portions of the underlying material.
Following the meticulous sanding stage, wipe away any residual dust with a clean microfiber cloth or utilize compressed air for hard-to-reach spots. Ensure that no particulate matter remains as these will be visible within your final painted finish.
The polishing segment involves using slightly dampened fine-grit sandpaper or higher grit polishers that can impart a glossy touch suitable as a foundation before applying paint. Move progressively towards finer abrasives as you continue smoothing out the primed surface until achieving a satin-like texture - one that feels sleek without any discernible granularity when touched.
3.Clean off the Dust
Begin by using a soft brush or compressed air to dislodge any loose particles. Care should be taken to cover all nooks and crevices where dust might have settled. Follow this by gently wiping down the entire area with a microfiber cloth, which is less likely to leave fibers behind compared to other materials.
For areas with stubborn dust accumulation, consider employing a vacuum with a small nozzle attachment to carefully extract particles from tighter spaces. After loosening and removing the larger debris, utilize an anti-static cloth or specialty tack cloth designed for pre-paint cleaning tasks, as this can pick up finer dust that traditional cloths may miss. A light hand is recommended while using a tack cloth; excessive pressure could potentially transfer its sticky substance onto the part, making it counterproductive.
To verify that all dust has been fully cleared, conduct a close inspection of the part in ample lighting.
4. Get Ready to Paint
With your primed and mounted part at hand, ensure you are in a well-ventilated area to safeguard your health and create an environment conducive to even drying. Don your safety gear, including gloves and a mask, to prevent inhalation of fumes and keep skin free from paint. Verify that your selection of paints is compatible with the primer used—acrylic, enamel, or another type formulated for plastic surfaces—and confirm their usability through a cursory inspection for separation or spoiling.
Gather all necessary painting tools such as airbrushes, spray cans, or brushes suited to your detail work preferences. Check that your airbrush’s nozzle size matches the detail level required and if using spray cans, test nozzles on scrap material first to acquaint yourself with their flow patterns. Secure various grits of sandpaper for potential last-minute touch-ups and have polishing cloths within arm’s reach for dust removal post-sanding.
Finally, stir or shake paints thoroughly according to their instructional guidelines ensuring even pigment distribution before their application onto the part.
5.Spray on the Undercoat
When you are ready to spray on the undercoat, make sure the primed part is still secured and mounted properly. This ensures stability and prevents any unwanted movement during application.
Select an undercoat that is appropriate for both your primer and the final paint color. Lighter colors will likely benefit from a lighter undercoat, whereas darker tones may be better paired with a darker undercoat. Carefully shake or stir your chosen paint as per manufacturer instructions to achieve proper consistency before application.
Hold the spray nozzle at a suitable distance from the part – typically about six to ten inches away – maintaining this distance consistently as you work around the object. Begin by spraying in a steady, controlled manner, moving in smooth motions that overlap slightly with each pass to prevent striping or uneven thickness.
Ensure good ventilation when applying the undercoat, wearing protective gear if necessary to safeguard against inhaling fumes. Apply thin layers rather than one thick layer to avoid runs or dripping which can diminish print detail and overall smoothness of your part. After spraying, allow sufficient time for drying before proceeding further in your project.
6. Polish Between Layers
After you have applied an undercoat, it’s necessary to gently polish the surface before adding subsequent paint layers. This process helps to smooth out any texture or imperfections that may have appeared during the painting process.
When polishing your primed part, use fine-grit sandpaper or a specialized polishing tool designed for delicate surfaces. It’s invaluable to do this with a light hand to prevent removing too much of the undercoat or damaging the part itself. Aim for evenness, ensuring that every inch of the part is attended to with care and precision.
After polishing, remove all dust particles resulting from sanding. This can be achieved with a soft brush or compressed air, followed by wiping with a clean microfiber cloth. Ensuring cleanliness at this stage is critical; any residual dust may lead to blemishes in subsequent layers of paint.
Upon completion of these steps, your part should possess a smooth and even surface that’s optimal for either additional coats of color or for applying the final topcoat, which will seal and protect your 3D printed masterpiece.
7.Masking Off Areas for Different Color Layers
To begin masking your 3D printed part, select a suitable masking tape that provides clean lines and does not leave behind adhesive residue. Carefully plan out which areas require masking based on your design and apply the tape tightly against the surface to prevent paint bleed. Make sure all edges are secured and there are no gaps that would allow paint to seep underneath.
For intricate designs or tight spaces where tape cannot easily reach, consider using liquid latex or a similar product designed for precise application. These can be painted on with brush or applicator tips to cover minute details accurately. Once applied, allow the masking medium to dry completely before proceeding.
As you prepare for topcoat application, inspect all masked areas one final time. It is essential that every intended section remains thoroughly covered to ensure your undercoat is kept intact and unblemished by subsequent layers of paint. This careful attention will yield a pristine outcome where colors hold their distinct boundaries for an impressive finished product.
8.Apply the Topcoat (Optional)
Once you have a 3D printed part that is primed, mounted, and prepared, you may opt to enhance its appearance with a topcoat. This process is not mandatory but can significantly improve the aesthetic quality of your final product. Prior to applying the topcoat, ensure that the undercoat is fully dry to avoid any adverse interactions between layers.
To begin, select an appropriate color and type of paint for your topcoat. Options include acrylics, enamels, or specialized model paints depending on your project’s requirements. Stir the paint thoroughly before use to ensure uniform color distribution and consistency.
When applying the topcoat, use steady hand movements and maintain a consistent spray distance as specified by the paint manufacturer to yield an even application. If you’re using a spray can or airbrush, execute controlled bursts or sweeps across the surface. Aim for light coats rather than a single heavy one; this minimizes drips and allows for better drying.
Be patient between layers—allowing sufficient time for each coat to dry avoids creating a tacky finish where dust can easily adhere. If necessary based on coverage or desired intensity of color, apply additional coats until you reach satisfactory opacity.
Once complete, inspect all surfaces from various angles under good lighting to ensure there are no gaps in coverage or noticeable imperfections in texture. The quality of your topcoat will greatly determine the perceived craftsmanship of your finished 3D part; hence take care during this stage to achieve professional-looking results.
9.Finish with Clearcoat
Applying a clearcoat is the final step in painting 3D printed parts, serving both to protect the painted surface and to provide a professional and aesthetically pleasing finish. Before beginning this process, ensure that the topcoat is thoroughly dry to avoid any chemical reactions or blending of coats that could compromise the appearance or structural integrity of your project.
Begin by preparing your clearcoat mixture according to product instructions; different types may have varying ratios of solution to hardener. It’s imperative to work in a well-ventilated area, wearing safety gear such as gloves and a mask. When you’re ready to apply, use even strokes to coat the part lightly. Aim for completeness over thickness—multiple thin layers are superior to one thick layer.
After applying each layer, give enough time for it to dry completely. This might be anywhere from a few minutes to several hours based on environmental conditions and the specifications of the clearcoat product used. Once dried, inspect for uniformity and absence of drips or texture inconsistencies.
If necessary, lightly sand any irregular areas with fine-grit sandpaper, taking care not to abrade through previous paint or primer layers. After any such corrections are made, remove all dust from sanding using compressed air or a damp cloth before proceeding with another layer of clearcoat.
Upon completing the last layer and allowing it ample time to cure—which can be up to 24 hours or as per manufacturer’s recommendations—the surface should present a consistent sheen. If required, further polishing can enhance glossiness after the clearcoat has hardened completely.
With diligence in application and patience in drying times, finishing with clearcoat can significantly elevate the durability and visual impact of your 3D printed parts, sealing your effort under a protective shield that allows colors beneath to shine through vividly.
In Conclusion
In summary, painting 3D printed parts involves careful preparation, appropriate painting techniques, and protective finishing to enhance the appearance and durability of the final product.
If you’re ready to take your 3D prints to the next level with a professional finish, begin by selecting the right paints and gather your materials. Don’t hesitate to explore your creative options and remember that practice makes perfect in achieving outstanding painted 3D printed pieces.